 Save
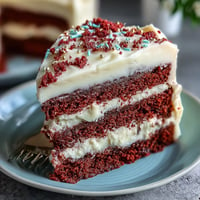
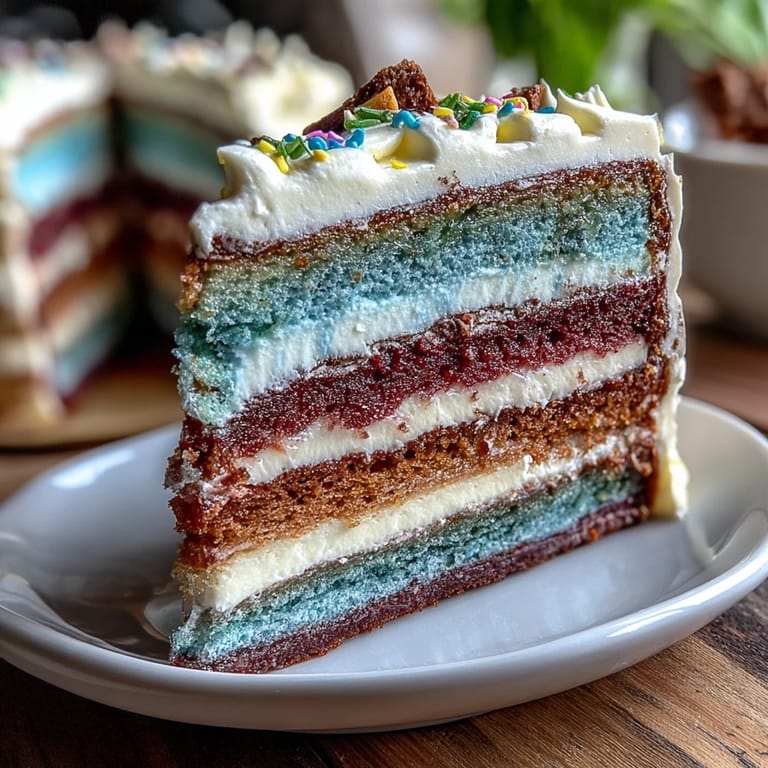
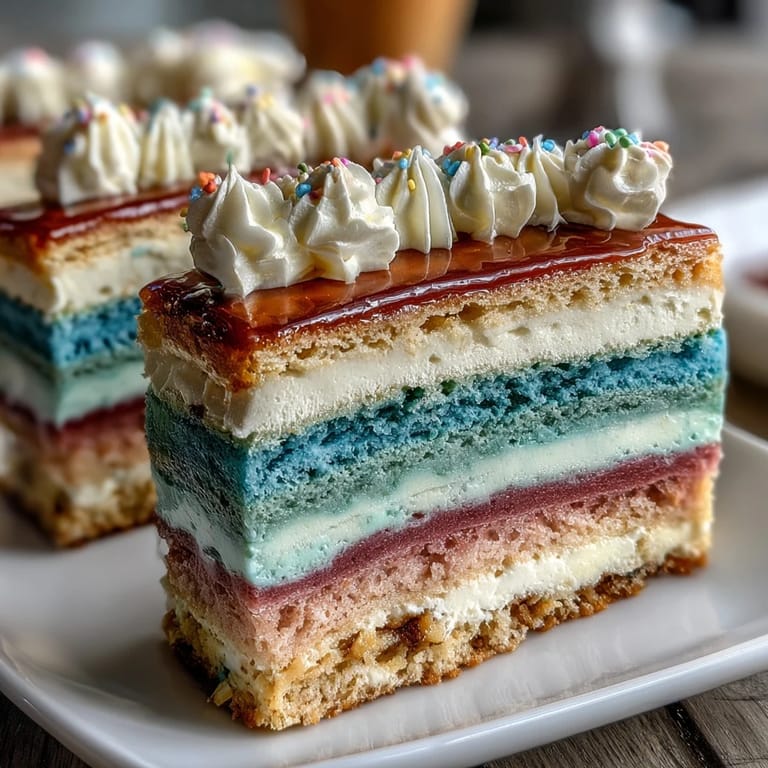
Save My niece texted me three weeks before her graduation with a simple request: make me something that looks as special as this moment feels. I'd never attempted an ombre cake before, but watching her describe the colors she wanted—the way her voice got excited talking about school colors bleeding into white—I knew this had to be the one. That afternoon in the kitchen became less about following instructions and more about creating something that would sit in the center of her party and make everyone pause.
I remember standing in my niece's kitchen the morning of her party, doing a final crumb coat while her friends kept peeking in asking if they could help. There was this moment—maybe thirty seconds—where the light hit the cake just right and all those subtle color shifts caught it perfectly, and everyone actually went quiet. That's when I realized this wasn't just about baking anymore.
Ingredients
- All-purpose flour (3 1/4 cups): This is your structure, so don't sift it unless your flour is genuinely lumpy; it aerates just fine whisked together with the baking powder.
- Baking powder (2 1/2 tsp): The rise here is gentle and even, which is exactly what you want for layers that stack cleanly.
- Salt (1/2 tsp): A small amount that makes the vanilla sing without announcing itself.
- Unsalted butter (1 cup, softened): Room temperature is non-negotiable—cold butter won't cream properly and your cake will be dense.
- Granulated sugar (2 cups): The beating time with butter creates tiny air pockets that keep the cake tender.
- Large eggs (4, room temperature): Cold eggs seize the batter; let them sit out for an hour if you can.
- Vanilla extract (1 tbsp): The backbone of flavor that lets the colors be the star.
- Whole milk (1 1/4 cups, room temperature): Alternating it with flour prevents overmixing, which is your secret to a moist crumb.
- Gel food coloring: Liquid food coloring will water down your batter and muddy the colors; gel is worth seeking out in craft stores or online.
- Egg whites (6 large) for buttercream: The safest approach is pasteurized eggs if you're concerned, though heating to 160°F kills pathogens naturally.
- Granulated sugar for buttercream (1 1/2 cups): This dissolves completely over heat, creating a stable, glossy frosting that doesn't break easily.
- Unsalted butter for buttercream (1 1/2 cups, softened and cubed): Add it slowly or the emulsion splits—I learned this the hard way on a Saturday night.
- Vanilla extract for buttercream (2 tsp): A touch more than the cake to balance the sweetness of the frosting.
Tired of Takeout? 🥡
Get 10 meals you can make faster than delivery arrives. Seriously.
One email. No spam. Unsubscribe anytime.
Instructions
- Set yourself up for success:
- Preheat your oven to 350°F and grease all four pans generously, then line the bottoms with parchment circles. Having everything ready—especially room-temperature eggs and milk—means you won't rush the creaming step, which is where the magic happens.
- Build your dry ingredients:
- Whisk flour, baking powder, and salt together in a medium bowl; the whisking aerates it just enough without you needing a sifter.
- Cream butter and sugar until it's almost fluffy:
- This takes about three to four minutes with a stand mixer; you'll see the mixture go from grainy to pale and light, and it should look almost like wet sand. Add eggs one at a time, waiting for each to fully incorporate before adding the next, then mix in vanilla.
- Alternate wet and dry, starting and ending with flour:
- Add a third of the flour mixture, then half the milk, then another third of flour, then the remaining milk, then the last of the flour. Mix on low speed just until combined after each addition; overmixing develops gluten and tightens the crumb.
- Divide and color your batter:
- Split the batter evenly into four bowls and add gel coloring to each, starting with barely a toothpick's worth in the first bowl and increasing gradually so you get a true ombre gradient. The colors should be noticeably different but not cartoonish.
- Bake with intention:
- Pour each colored batter into its pan and smooth the tops gently with a spatula. Bake for 22 to 25 minutes; a toothpick should come out clean but not with crumbs clinging to it.
- Cool the layers properly:
- Let them sit in the pans for exactly ten minutes—not longer or they'll stick, not shorter or they'll break—then turn them out onto wire racks to cool completely, at least two hours.
- Make the buttercream base:
- Combine egg whites and sugar in a heatproof bowl, then set it over a pot of barely simmering water, whisking constantly. You're looking for the mixture to reach about 160°F on a thermometer, which takes five to seven minutes and dissolves the sugar completely.
- Whip until cool and billowy:
- Transfer to a mixer and whip on high speed for about ten minutes until stiff peaks form and the bowl is cool to the touch. This step matters because warm buttercream will break.
- Add butter gradually and with patience:
- Add cubed butter a handful at a time, mixing well between additions; if it looks curdled or separated, keep mixing—it will come together. Add vanilla at the end.
- Layer with confidence:
- Place your darkest layer on the cake stand, spread a generous layer of buttercream on top, then repeat with each layer from darkest to lightest. Trim any doming with a serrated knife if needed.
- Apply the crumb coat:
- Spread a thin, smooth layer of buttercream over the entire cake—this traps crumbs so your final frosting is pristine. Chill for at least twenty minutes until it's firm.
- Frost and finish:
- Apply the final layer of buttercream, using an offset spatula to create smooth sides or a textured finish, however you prefer. If you want a true ombre effect on the outside, tint portions of the remaining buttercream and blend them together.
- Decorate and chill:
- Add pearls, a cake topper, or piped details while the frosting is still slightly soft so they adhere. Chill the finished cake until serving time, then bring it to room temperature for the best flavor and texture.
 Save
Save When my niece cut into that cake at her party, the ombre layers revealed themselves like a surprise, and her whole face lit up in a way that had nothing to do with the colors and everything to do with knowing someone had spent time thinking about making her moment beautiful. That's the thing about a cake like this—it's never just cake.
Why Ombre Matters for Milestones
An ombre cake works for celebrations because it's visually striking without being loud about it. The gradient draws your eye and feels intentional, like someone thought about every detail. When you're marking a moment—graduation, promotion, a birthday that feels significant—this cake says you cared enough to try something you'd never done before, and that matters more than perfection.
The Buttercream That Doesn't Betray You
I've made American buttercream a hundred times, and it breaks when the kitchen is warm or I rush it. Swiss meringue buttercream is different because the heat kills the risk, and the butter incorporates with fewer drama moments. It's also less sweet, which means you can actually taste the cake, and it holds its shape even if your party stretches into the evening and the kitchen gets warm. Once you understand the technique—heat the eggs, whip it cool, add butter slowly—you'll reach for it every time.
Customizing Your Celebration Cake
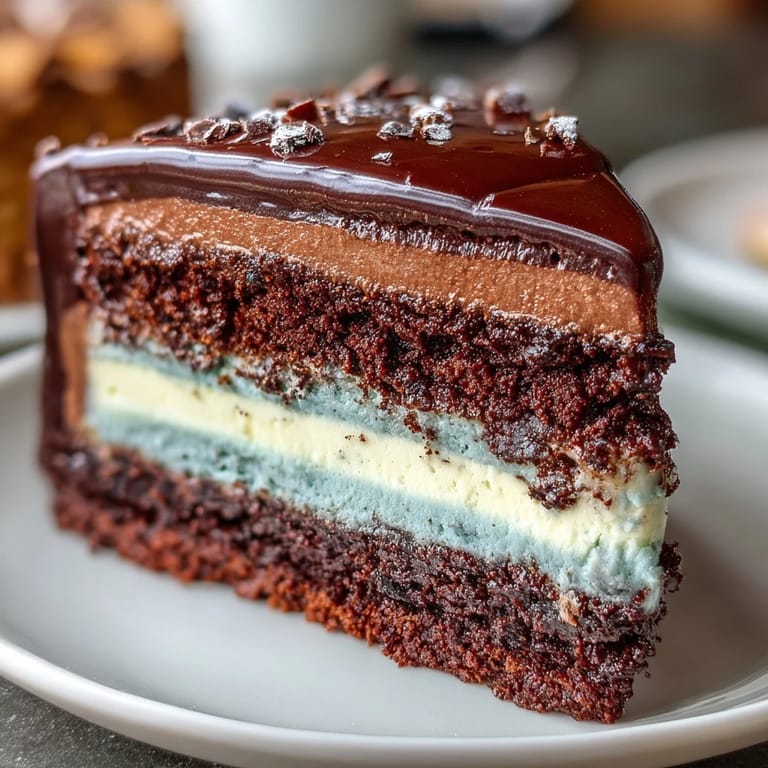
The beauty of this cake is how personal you can make it without changing the recipe. School colors, sunset tones, pastels, even a dramatic dark-to-light effect—the structure stays the same. You could also add chocolate to some layers by whisking cocoa powder into the batter before dividing and coloring, creating a completely different but equally stunning cake. The person you're celebrating should see themselves in it somehow.
- If you don't have four pans, bake the layers in two rounds, wrapping each cooled layer tightly in plastic wrap until you're ready to frost.
- This cake keeps well covered in the refrigerator for three days, so you can bake and frost the day before if that eases your timeline.
- Bring slices to room temperature before serving; cold cake tastes muffled, and you want the vanilla and butter flavors to shine.
 Save
Save Make this cake knowing it will impress, knowing it will taste as beautiful as it looks, and knowing that someone is going to remember that you made something special just for them. That's the whole point.
Recipe FAQs
- → How do I achieve the ombre color effect in the layers?
Divide the cake batter evenly into separate bowls and tint each with increasing amounts of gel food coloring to create a smooth gradient from light to dark.
- → What is Swiss meringue buttercream and how is it made?
Swiss meringue buttercream is a silky frosting made by gently heating egg whites and sugar, whipping them into stiff peaks, then gradually adding softened butter for a smooth texture.
- → Can I prepare the cake layers in advance?
Yes, bake the layers ahead of time and store them wrapped tightly in the refrigerator or freezer before assembling and frosting.
- → What decorations work well with this layered cake?
Edible gold or silver pearls, themed toppers like graduation caps, and piped buttercream details complement the ombre layers beautifully.
- → How can I ensure even baking of all layers?
Use four 8-inch pans, distribute batter evenly, and bake at 350°F until a toothpick comes out clean, usually 22–25 minutes.
- → Are there any tips for achieving vibrant colors?
Use gel food coloring rather than liquid for richer colors and avoid adding too much liquid that could affect batter consistency.